


Friday, December 19, 2014
Monday, November 24, 2014

Check out this LINK where Chet Pourciau Design was featured in a Bed Bath and Beyond article!
Make Ugly Wires Disappear
BY BONNIE VENGROW
A few years ago, my husband and I had our living room professionally redone, and afterward, the decorator photographed it for her portfolio. Before she even turned on the camera, she steamed wrinkles out of drapes and dressed up surfaces with funky accent pieces. Then did something unexpected: She unplugged everything. Her explanation? Though necessary in our everyday lives, wires are, well, ugly. And after scrolling through the photos of our wireless room, I saw her point.
Since then, I’ve been on a mission to conceal the mountain of snaking cords that are part and parcel of our modern life — or, at the very least, organize them. But to be perfectly honest, that’s easier said than done, especially for a less-than-crafty gal like myself. What I needed were simple strategies that really work, so I turned to Chet Pourciau, a veteran decorator and stager and owner of Chet Pourciau Design in New Orleans. Here are his tried-and-true tips for making a tangle of wires disappear.
Cover up with fabric. Just like a well-cut dress or jacket can hide many a flaw, so too can a beautiful piece of fabric conceal an unsightly mess of wires. Pourciau often hangs drapery to hide electrical cords and outlets. For maximum effect, he likes to position curtains so they make the room feel larger than it is. “Remember to hang your drapery close to the ceiling to trick the eye into thinking the ceilings are taller than they really are,” he says.
Fabric also does a beautiful job camouflaging wires closer to the ground. To clean up a home office area, try draping a gorgeous piece of fabric over the desk, or wrap a group of wires with grosgrain fabric that matches the walls or baseboards. If all else fails, you can always sneak them under a rug.
Build a false panel. I know what some of you are thinking: I thought these were supposed to be easy DIY jobs. But trust me, this isn’t as involved as it sounds. In fact, false panels are a nifty workaround when there are wires in and around a piece of furniture. “In one case, I had a bookshelf that had cords and outlets that were distracting to the eye,” Pourciau says. “I fixed the issue by cutting out pieces of wood that fit onto the back of the bookshelf. The panel sandwiched the cords between the ‘real’ back and false panel. This allowed me to display decorative items without distractions.”
Buy pre-made cord covers. Wires, like taxes or surprise visits from your in-laws, are sometimes unavoidable. (Hello, wall-mounted TV!) And when those dangling strips of plastic can’t be tucked away, there are cord covers. These handy pieces of plastic are designed to neatly house a gaggle of wires while lying as flush as possible against the wall. They’re unobtrusive, easy to install and work like a charm every time. Traditional plain white or gray ones are fine, but why not let something practical also be pretty? Pourciau likes decorative cord covers and also has painted them a fun, vibrant shade to add a punch of color to a room. “Who says you can’t have a Radiant Orchid cord cover?” he points out.
Tame the tangle. If you do nothing else to manage your wires, at least organize them so they appear tidy. You could buy cord wraps, though Pourciau swears by plain old bread-bag twist ties. “They’re easy to handle, and grouping all the wires together makes a huge impact,” he says.
Bonnie Vengrow
DIY Plaster Leaf Ornaments

These ornaments were so fun and easy to make. I love how they give a natural and organic element to my Christmas tree. Follow the instructions below to make your own DIY Plaster Leaf Ornaments

- Plaster of Paris
- Faux leaves
- Hangers
- Ornament hooks
- A container to mix in

Attach an ornament hook to the leaves

Mix plaster and water in a container according to the directions on the back of the plaster

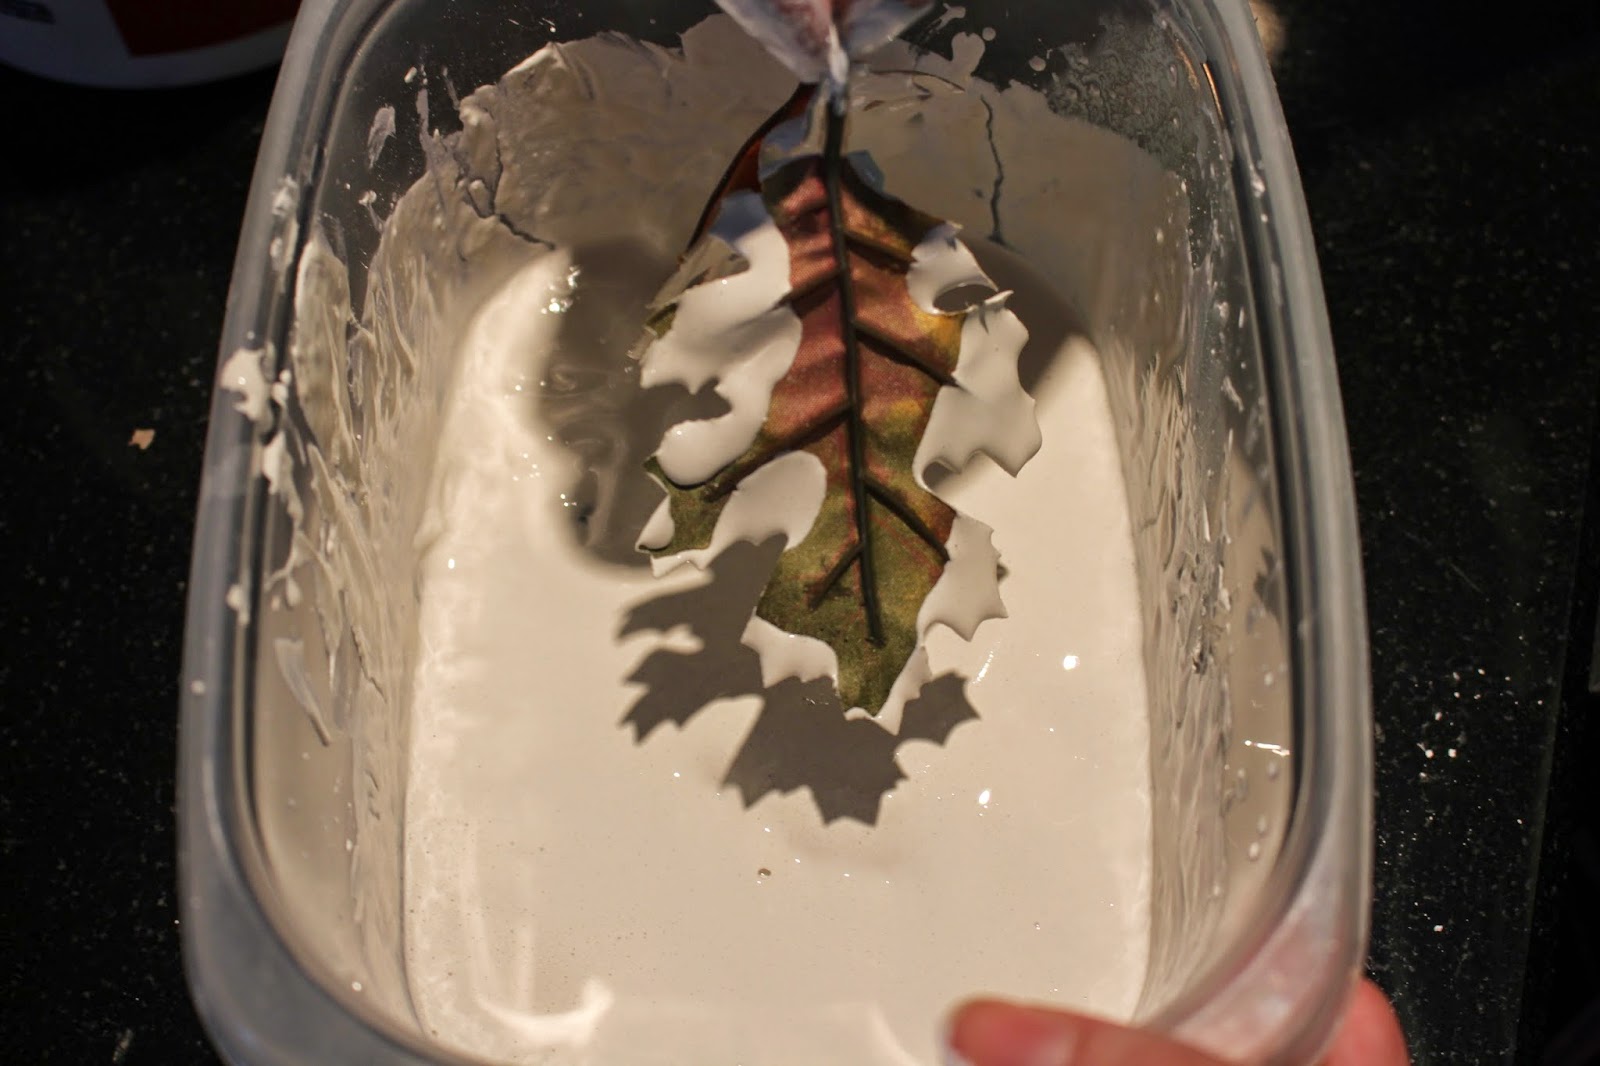
Dip the faux leaves in the plaster, make sure to evenly coat the leaves.


Dry the leaves over night by hanging them from a hanger. Make sure that they do not touch each other while drying.

Enjoy!
Thursday, November 13, 2014
5 Tips to a Stress-free Holiday Table Setting

Holiday get togethers should be fun and stress free. So I have put together my top 5 ways to a stress free table setting

1. Mix and matched patterns and colors
Don't worry if you don’t have a set of 12 matching place settings. You can see here that I mix and matched patterns and colors of dishware that I already had. You can use 2 sets of dishes, just alternate colors for a cohesive design.

2. Use your own sense of style
My second tip which relates to mixing and matching is to use your own sense of style. You don't have to use traditional color schemes. It's your home, family and friends. They already know your style – decorate with colors you like.

3. Use natural elements in your table setting

These are such easy DIYs. Start off by cleaning your pine cones. I did this by soaking them in warm water and vinegar. After you let them dry, you can then add a name tag or a tea light candle.
4. Create mood lighting
Create mood lighting by using warm colored light bulbs in your chandelier. You can also use candles. Just remember to use unscented candles so that they don’t fight with the smells of your dinner

Find how to make this DIY at this LINK
5. Make a DIY Project
This is an extremely easy DIY! Check out this LINK to learn how to make it.


Floating Cranberry and Tea Light DIY

Are you looking for an easy DIY for your Holiday table centerpiece? Look no further! To get this look, float fresh cranberries and tea light candles an oblong bowl with water.
This DIY is gives off great mood lighting, just remember to use unscented candles so that the smell doesn't fight with the smell of your dinner!


DIY Cranberry Topiary


To make this DIY all you will need is:
- Foam ball
- Red paint
- Cranberries
- Toothpicks

Start off by painting your foam balls red

When your paint is dry, you can start to break toothpicks in half.

Insert toothpick halves into the foam ball and leave a ¼ inch of the toothpick exposed.
Now you can add the cranberry to the toothpick.

Try to keep them as close as possible. So that there are no gaps

You can now display them on a vase to create a topiary effect. Enjoy!
Thursday, October 23, 2014
DIY Haunted Lady Halloween Decor


I'm always thinking of spooky Haloween DIYs for my front porch, this one will surely frighten any trick-or-treaters who will be knocking on my front door. Follow the instructions below to make your own Haunted Lady.
What you will need:

- Styrofoam heads (I found them at my local arts and crafts store for $5)
- Mod Podge or clear drying glue
- Cheese cloth
- Instant coffee
- Black and white paint
- A bowl and cookie sheet
- String

Start off by mixing some instant coffee in some water. You will need about half a cup of water and 3 tablespoons of coffee. Ball up the cheese cloth and dunk it in the coffee. Take it out right away and squeeze out any liquid.

You can wait for your cheese cloth to dry - but I have no patience. Quick dry your cheese cloth by putting it in the oven for 15 mins on 240 degrees.

As your cheese cloth drys, you can start to paint the face.


Paint the Styrofoam head where natural shadows would be.

When your cheese cloth and paint is dry, drape the dyed cheese cloth over the Styrofoam head. Now you can use mod podge to stick the cheese cloth to the head.

I put two layers of cheese cloth on my haunted lady. Cut a 12 inch piece of string to wrap around your haunted lady's neck. This will help the mod podge dry.

Let dry over night.


Voila!

Happy Halloween!
Monday, October 20, 2014
Thursday, October 16, 2014
DIY Fall Pumpkin Pot

I like to decorate with items that can transition from the Halloween season to Thanksgiving. That way I only have to decorate once for Fall. Decorating with bright plants and the color of the season (Pantone's Cypress) help bring a Fall feel to your space. I like using inexpensive materials so that I can change up my pots and secondary colors every year.
Follow the instructions below to make your own fall pumpkin pot.
What you will need:
- Plastic pumpkin holders
- Paint - I used the color for fall (Pantone's Cypress)
- Paint brush
- Hot glue gun
- Ribbon
- Scissors
- Exacto knife/ box cutter

Supplies

I got the inspiration for the project when I saw these $1 pumpkins at my local store

Start off by painting your plastic pumpkins. I ended up painting 2 thin layers of paint.

Let dry. After they are dry, puncture a small hole in the bottom of the plastic. This will allow water to drain when you water your plants.

For an added embellishment, you can add ribbon to your design. Use hot glue for a mess free application.

I like to use mums in my decor. They come in many bright fall colors and are easy to take care of.

Voila!
Turn the pot's face out during Halloween and then turn the pot around for Thanksgiving! Happy Halloween!
Subscribe to:
Posts (Atom)
