Wednesday, July 31, 2013

Bringing Early American Style to the University Area

Check out this LINK for the original article from myneworleans.com


PHOTOGRAPHY CHERYL GERBER

ARTICLE BY BONNIE WARREN

Located in the University Area of New Orleans, the circa 1920s Federal-style home of Timothy “Tim” Fields is a study in simplicity. “I have always admired all things in the Federal style, from architecture to furnishings,” Fields says. “The architecture is associated with the early American Republic, and I like it because it’s balanced, symmetrical and simple, while I enjoy Federal-style furniture that I consider elegant, classic and timeless.”

Enter the iron-fenced front garden through the vine-covered gate, and view the tree-shaded two-story home on a corner lot. It is definitely classic Federal-style architecture. “I liked everything about the house when I first saw it in 2006,” continues Fields, an attorney with his own law firm. “I especially noted that it had large living and dining rooms, since I enjoy entertaining.”

Now filled with fine Federal-style furniture, the main formal rooms are much in keeping with what Fields learned to love growing up in Virginia. “My grandmother, Nannie B. Patrick, loved Federal antiques and I always wanted a house with formal rooms furnished elegantly just like hers. Fortunately, I inherited many of her fine antiques that now fit perfectly in my home.”

For guidance, Fields brought in Chet Pourciau, a well-known designer. “I needed Chet’s talent to help me make the formal, yet comfortable, home I envisioned,” he says. “While I wanted the living and dining room to be formal, I also wanted my new kitchen, den and outdoor entertaining area to be modern with lots of style.”

Pourciau gave Fields everything he asked for and more. “In the living room and dining room, I showcased his fine antiques, art and accessories, while I designed a dramatically handsome new den and kitchen across the rear of the house,” Pourciau explains. “Then I addressed Tim’s desire for the perfect outdoor entertaining location by adding a large deck and an adjoining courtyard with a formal fountain.

“It’s the perfect house for entertaining,” Fields explains. “I have had seated brunches for 24, birthday parties for 50 and indoor-outdoor celebrations for 100. This house has everything I want, and I never tire of enjoying the modern kitchen, den and outdoor entertaining area.”


Check out this LINK to see more photos and for the original article from myneworleans.com


Monday, July 29, 2013

Thursday, July 25, 2013

Chet's Top 7 Local Design Accessories under $100

I always stress the importance of recycling, reusing and repurposing with design.  Another important factor is to stay within budget.  You don't have to spend a ton of money to achieve the look you're going for in design.  Here are my top seven design accessories for under $100 from local shops in New Orleans. 

1. Retro bicycle 17W x 9H - $80.00 at Eclectic Home, 8211 Oak St. 
2. Susanna Chevron Box in Blue/Ivory Bone 6W x 4D x 2H - $85.00 at Eclectic Home, 8211 Oak St.
3. Seagrove Candle for $32 by Chet Pourciau Design, 3652 Magazine St.
4.  Hand-blown Glass Piggy Bank 9"W  x  7"H. This whimsical bank will look great displaying your pocket change in any room.  $38 at Chet Pourciau Design, 3652 Magazine St.

5.  Butterfly frame: This adjustable dual-sided frame features two entomology prints. $70 at Perch, 2844 Magazine St.
6.  Tangerine Dune Tray: This funky tray is made out polycarbonate, and  
features a textured bottom, that is reminiscent of sand dunes. $85 at Perch, 2844 Magazine St.
7.  Vintage Seltzer bottle: This aqua seltzer bottle channels a different era, and functions as a beautiful piece of thick-cut glass. $100 at Perch, 2844 Magazine St.


Thursday, July 18, 2013

Instructions for the DIY Segment from the July 2013 Episode of Chet Chat

Did you love the kid-approved DIY segment from last night's Chet Chat episode?  Do you want to tackle one of these projects at home on your own?  Here are the instructions!

"An Apple a Day" Notepad

Materials needed:
Blank paper
Hot glue gun
Red magic marker
Twig or stem (from apple)
Green card stock paper (for leaf)
A pen/pencil
Scissors
Binder clips (or rubber bands)

A classic teacher treat with a crafty twist that even kids can help make!

First, have your little one play project leader by drawing a half-apple shape or heart on a sheet of paper (you may also opt to have them trace a cutout).
Using scissors (mom's or dad's job), cut out your desired number of notepad pages. You may need to repeat this process a few times.
After you've finished cutting, have your "project leader" color the outside edges of the papers red using the magic marker (or green for a different look).
Divide the pages into two piles.
Next -  Mom/Dad this is you again! - apply hot glue to the inner edges of the pages so they stick to the stem. Use the binder clips to help keep the pages together.
Once the glue has dried and cooled, have your "project leader" fan the pages so that it creates an apple.
Finally, add a cutout green leaf with your child's name on it and bring it to school the next day.

DIY Flower Pens & Vase

What you need:
One faux flower per pen
Pens
Mason jar (or any other container you'd like to use)
Sea glass (or rocks, pebbles, coffee beans, etc)
Floral tape
Scotch tape (to make holding the flower to the pen easier)
Scissors or wire cutters (to make the flower stem the same length as the pen)
Baby powder
Grosgrain ribbon

Use your scissors or wire cutters to trim the flower stem so it's the exact length of the pen(s).
To make the next part easy, use a piece of scotch tape to hold the stem in place to the pen.
Starting at the end of the pen, wrap the floral tape around the pen. Make sure you're pulling it tight as you wrap just so as to not rip the tape. Use your thumb to help secure and smooth on the tape.  It's best to use small pieces and layer as you go along.
Wrap all the way down to the point. You may want to re-wrap on both ends.
Repeat until your desired number of pens are completed.
Here's where the baby powder comes in...you'll notice your floral tape is sticky on both sides. Once you've finished wrapping, sprinkle the baby powder on your hand and rub gently onto the tape. This will help the pens feel less sticky and also helps to seal the tape.
Grab your mason jar and fill the bottom with sea beads (or your choice of filler). This will help hold the flower pens in place.
Tie it off with a ribbon bow around the mouth of the container. (Dabbing regular glue on the edges of the ribbon where you cut will help stop any fraying.)

Tuesday, July 16, 2013

Monday, July 15, 2013

Acadiana LifeStyle Magazine - July 2013

Chet is featured in the July 2013 issue of Acadiana LifeStyle magazine as the featured Personality Profile! Check it out here!


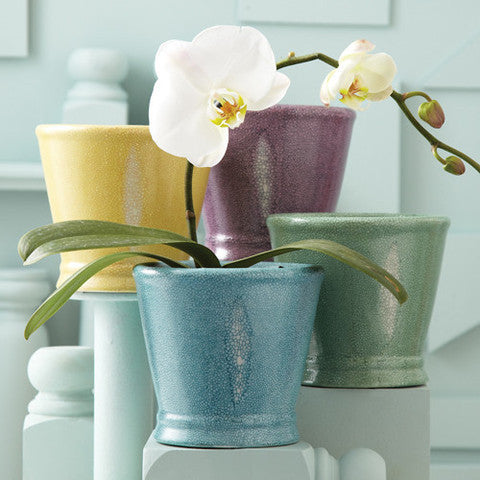
Just in - Shagreen Planter Pots

These multicolored pots are easily dressed up by placing an orchid in them. Check out the link below to get your own!

http://chet-pourciau-design.myshopify.com/products/shagreen-planter-pots


Friday, July 12, 2013

DIY Bastille Day Photo Transfer Art

This is a great DIY if you like antique prints. Photo transfers are also quite an inexpensive way to create your own art.

All you need for this DIY is:

  • A piece of light colored wood. I bought mine at an arts and crafts store, but you can buy a single piece of wood at a home improvement store and have them cut it down to your specifications.
  • Gel Medium. I bought regular matt.
  • A laser printed photo. Make sure you use a laser printer because inkjet will not work. If you want to add text to your art, print the text in reverse. 
  • A plastic spoon.
  • A wet sponge.


Use the spoon to scoop out some gel medium, then use your finger to spread the gel out. Make sure you use enough to coat the entire piece of wood, but too much because the photo will not transfer correctly. 

Place your photo on the wood and smooth out as well as you can. Let dry overnight or until completely dry. You MUST be patient. 

When completely dry, run water over the wood to dampen the paper.

Now you can start to scrub off the paper.

If took a couple times of scrubbing to take off all the paper.


Voila! French art!